Latest Videos

Thứ Ba, 30 tháng 7, 2013

Remove Low Quality Links With Google’s Disavow Links Tool

Since Google implemented the Penguin update last April 2012 many webmasters and site owners began to worry and started to ask other sites to stop linking to them and remove any previously placed links. This is because they didn’t want their site to experience a decrease in search engine rankings due to being linked to low quality or spammy sites. So in order to help concerned webmasters and site owners, Google came up with the Disavow Links Tool, which they launched on October 2012 to provide a convenient means to perform the aforementioned task.
Should you use this tool? Well, if you think that your site has experienced a decrease in rankings due to Google’s Penguin Update because you may have purchased or gained links through spamming, then chances are that the answer is yes. You can read more about this tool here.

Thứ Bảy, 27 tháng 7, 2013

Automatically Share Blog Posts In Facebook

As any wise blogger knows, one of the best ways to direct more traffic into one’s blog is by sharing their blog posts on popular social sites like Facebook. However, even with the promising results that this practice brings, some bloggers still don’t do it as much, or enough at all. Why? Because they find it to be too troublesome.
One way to solve this problem is by offering them a means of doing it automatically. So how is this accomplished? With the help of a Facebook app called RSS Graffiti!
All it takes is for you to log in to Facebook, proceed to the app’s page, and then just fill up the form with all of the necessary information it requires to run the app. If you’re worried about getting lost in the process, don’t fret! Blogger user Gayan Dulantha has created a nice, easy-to-follow guide that’ll help you go about the process. You can find his instructions here.

Thứ Tư, 24 tháng 7, 2013

Things to Do Before Publishing A Blog Post

In publishing posts, there are some practices that a blogger must do before hitting the publish button for SEO purposes. Although it’s by choice, if you’re into serious posting, then you should follow these practices for essential SEO utilization to help your site achieve a higher page rank.
Below are some of the tips I learned from well-established bloggers.
  • Make your titles catchy. Users tend to click on the title that appeals to them, so writing a good title with a hook increases your site’s traffic thus also increases its SERP and get to Google’s first page.
  • Optimize URLs. You need to have permalink optimization as Google pays closely to the URLs. Always use short URLs with target keywords of the topic so it will easily be found.
  • Interlink to older posts. Internal linking is said to be 5 times better than related post widgets. By doing this, you connect the whole blog to readers, and increases page views as well.
  • Check the spelling and grammar. One of the prerequisites for writing a good blog post is to the go by rules of spelling and grammar. Sloppy spelling, grammatical errors, and poor sentence/idea construction will negatively affect your credibility.
  • Use images. Using images makes your posts more eye-catching and interesting. Be sure to use alt text and a short description when embedding your images.

Thứ Bảy, 20 tháng 7, 2013

Related Posts Widget With Thumbnails And Summary For Blogger


55Related Posts Widget With Thumbnails And Summary For Blogger

0 
There are several tutorials quite old which have explained different methods for displaying related posts in Blogger [1] [2] but in this tutorial, I will show you how to implement a very beautiful Related Posts widget that comes along with Thumbnails and Posts Snippets, as well. If you want to add it, follow the next steps below:

How to Add Related Posts Widget with Summary to Blogger

Step 1. From your Blogger Dashboard, go to Template and click on Edit HTML


Step 2. Tick the "Expand Widget Templates" checkbox:
 Step 3. Find (CTRL + F) this tag:

 </head>

...and paste the following code just above it:

 <script type='text/javascript'>
//<![CDATA[
var relatedTitles = new Array();
var relatedUrls = new Array();
var relatedpSummary = new Array();
var relatedThumb = new Array();
var relatedTitlesNum = 0;

var relatedPostsNum = 4; // number of entries to be shown
var relatedmaxnum = 75; // the number of characters of summary
var relatednoimage = "https://blogger.googleusercontent.com/img/b/R29vZ2xl/AVvXsEiPNqQlwdO2rAxAdXCCJtYnufbnhArq32vkqQnppG82oSybkcj7Mb-rfaT0Z_K8EkQzpRuKE4QnMHD0JrM4An_5xkxHtB0SJ7IKrlCgK0dm2dvFY2orC74652-EISeEo20n_0XlxU8Sh-ZF/s1600/no_image.jpg"; // default picture for entries with no image

function readpostlabels(json) {
  var entry, postimg, postcontent, cat;
  for (var i = 0; i < json.feed.entry.length; i++) {
    entry = json.feed.entry[i];
    if (i==json.feed.entry.length) { break; }
    relatedTitles[relatedTitlesNum] = entry.title.$t;
    postcontent = "";
    if ("content" in entry) {
      postcontent = entry.content.$t;
    } else if ("summary" in entry) {
      postcontent = entry.summary.$t;
    }
    relatedpSummary[relatedTitlesNum] = removetags(postcontent,relatedmaxnum);
    if ("media$thumbnail" in entry) {
      postimg = entry.media$thumbnail.url;
    } else {
      postimg = relatednoimage;
    }
    relatedThumb[relatedTitlesNum] = postimg;
    for (var k = 0; k < entry.link.length; k++) {
      if (entry.link[k].rel == 'alternate') {
        relatedUrls[relatedTitlesNum] = entry.link[k].href;
        break;
      }
    }
    relatedTitlesNum++;
  }
}
function showrelated() {
  var tmp = new Array(0);
  var tmp2 = new Array(0);
  var tmp3 = new Array(0);
  var tmp4 = new Array(0);
  for(var i = 0; i < relatedUrls.length; i++) {
    if(!contains(tmp, relatedUrls[i])) {
      tmp.length += 1; tmp[tmp.length - 1] = relatedUrls[i];
      tmp2.length += 1; tmp2[tmp2.length - 1] = relatedTitles[i];
      tmp3.length += 1; tmp3[tmp3.length - 1] = relatedpSummary[i];
      tmp4.length += 1; tmp4[tmp4.length - 1] = relatedThumb[i];
    }
  }
  relatedTitles = tmp2; relatedUrls = tmp; relatedpSummary = tmp3; relatedThumb = tmp4;
  for(var i = 0; i < relatedTitles.length; i++){
    var index = Math.floor((relatedTitles.length - 1) * Math.random());
    var tempTitle = relatedTitles[i]; var tempUrls = relatedUrls[i];
    var tempResum = relatedpSummary[i]; var tempImage = relatedThumb[i];
    relatedTitles[i] = relatedTitles[index]; relatedUrls[i] = relatedUrls[index];
    relatedpSummary[i] = relatedpSummary[index]; relatedThumb[i] = relatedThumb[index];
    relatedTitles[index] = tempTitle; relatedUrls[index] = tempUrls;
    relatedpSummary[index] = tempResum; relatedThumb[index] = tempImage;
  }
  var somePosts = 0;
  var r = Math.floor((relatedTitles.length - 1) * Math.random());
  var relsump = r;
  var output;
  var dirURL = document.URL;

  while (somePosts < relatedPostsNum) {
    if (relatedUrls[r] != dirURL) {

      output = "<div class='relatedsumposts'>";
      output += "<a href='" + relatedUrls[r] + "' rel='nofollow'  target='_self' title='" + relatedTitles[r] + "'><img src='" + relatedThumb[r] + "' /></a>";
      output += "<h6><a href='" + relatedUrls[r] + "' target='_self'>" + relatedTitles[r] + "</a></h6>";
      output += "<p>" + relatedpSummary[r] + " ... </p>";
      output += "</div>";
      document.write(output);
  
      somePosts++;
      if (somePosts == relatedPostsNum) { break; }
    }
    if (r < relatedTitles.length - 1) {

      r++;
    } else {
  
      r = 0;
    }

    if(r==relsump) { break; }
  }
}
function removetags(text,length){
  var pSummary = text.split("<");
  for(var i=0;i<pSummary.length;i++){
    if(pSummary[i].indexOf(">")!=-1){
      pSummary[i] = pSummary[i].substring(pSummary[i].indexOf(">")+1,pSummary[i].length);
    }
  }
  pSummary = pSummary.join("");
  pSummary = pSummary.substring(0,length-1);
  return pSummary;
}
function contains(a, e) {
  for(var j = 0; j < a.length; j++) if (a[j]==e) return true;
  return false;
}
//]]>
</script>

Note:  
  • To change the number of posts that are being displayed, modify the value in red (4)
  • To change the number of characters to be shown in posts summary, modify the value in green (75)
  • To change the default pic for posts with no images, add your URL instead of the one marked in blue

Step 4. Search (CTRL + F) for the following fragment:

 <a expr:href='data:label.url' rel='tag'><data:label.name/></a><b:if cond='data:label.isLast != &quot;true&quot;'>,</b:if>

... and add this code just below it:

 <b:if cond='data:blog.pageType == &quot;item&quot;'>
    <script expr:src='&quot;/feeds/posts/default/-/&quot; + data:label.name + &quot;?alt=json-in-script&amp;callback=readpostlabels&amp;max-results=50&quot;' type='text/javascript'/>
  </b:if>

The entire fragment should look like this:

           <b:loop values='data:post.labels' var='label'>
            <a expr:href='data:label.url' rel='tag'><data:label.name/></a><b:if cond='data:label.isLast != &quot;true&quot;'>,</b:if>
<b:if cond='data:blog.pageType == &quot;item&quot;'>
    <script expr:src='&quot;/feeds/posts/default/-/&quot; + data:label.name + &quot;?alt=json-in-script&amp;callback=readpostlabels&amp;max-results=50&quot;' type='text/javascript'/>
  </b:if>

          </b:loop>

Step 5. Find this fragment of code:

 </b:includable>
<b:includable id='postQuickEdit' var='post'>

Note: if you can't find it, then search only for the code in red

! Click on the sideways arrow to expand the code, then scroll down until you reach to the highlighted line !

...add just ABOVE it, add the following:

 <b:if cond='data:blog.pageType == &quot;item&quot;'>
  <div class='post-footer-line post-footer-line-4'>
    <div id='relatedpostssum'><div style='text-align: left; font-size: 15px; margin-bottom: 10px; font-weight: bold;'>RELATED POSTS</div>
      <script type='text/javascript'>showrelated();</script>
    </div>
    <div style='clear:both;'/>
  </div>
</b:if>

Screenshot

Step 6. Let's go ahead and add some styles to our CSS... search for this tag:

 ]]></b:skin>

...and paste the below code just ABOVE it:

 .relatedsumposts {
  float: left;
  margin: 0px 5px;
  overflow: hidden;
  text-align: center;
  /* width and height of the related posts area */
  width: 120px;
  height: 210px;
}

.relatedsumposts:hover {
background-color: #F3F3F3; -webkit-border-radius: 10px;
-moz-border-radius: 10px;
border-radius: 10px;
}

.relatedsumposts img:hover {
-khtml-opacity:0.4;
-moz-opacity:0.4;
opacity:0.4;
}

.relatedsumposts a {
  /* link properties */
color: #linkcolor;
  display: inline;
  font-size: 10px;
  line-height: 1;
}
.relatedsumposts img {
  /* thumbnail properties */
margin-top: 2px;
  height: 82px;
  padding: 5px;
  width: 82px;
border: 1px solid #fff;
-webkit-border-radius: 100px;
-moz-border-radius: 100px;
border-radius: 100px;
-webkit-box-shadow: 0 1px 2px rgba(0, 0, 0, .4);
-moz-box-shadow: 0 1px 2px rgba(0, 0, 0, .4);
box-shadow: 0 1px 2px rgba(0, 0, 0, .4);
}
.relatedsumposts h6 {
  /* title properties */
  display: table-cell;
  height: 5em;
  margin: 5px 0 0;
  overflow: hidden;
  padding-bottom: 2px;
  vertical-align: middle;
  width: 130px;
}

.relatedsumposts p {
  /* summary properties */
border-top: 1px dotted #777777;
border-bottom: 1px dotted #777777;
color: #summarycolor;
  font-size: 10px;
  height: 4em;
  line-height: 1;
  margin: 5px 0 0;
  overflow: hidden;
  padding: 5px 0 15px 0;
  text-align: left;
}

Note:  
  • Modify the values in red to adjust the width (120) and height (210) of the widget area
  • Replace #linkcolor with the hex value of your color to change the color of post titles
  • To change the size of thumbnails, modify the values marked in violet (82)
  • To determine the border roundness, modify the values in orange (100)
  • To change the color of the post snippet, change #summarycolor with color hex value

Step 7. Save your Template... and hopefully we're done...

Thứ Sáu, 19 tháng 7, 2013

Free Template - Blogger Buster Christmas

Just in time for the festive season, I'm happy to release my latest Free Blogger template, Blogger Buster Christmas:


Demo | Download


This seasonal template features:
  • Festive colour scheme and overall design
  • Featured Content/Gadget sections which only appear on the home page
  • Compatible with the new Blogger Template Designer to easily alter the layout, width, gadget sections, etc.
  • Festive icons included in the original design
  • Makes use of Google Web Fonts for added style of headings and blog title

How to install this Blogger Template

  1. Extract the contents of blogger-buster-christmas.zip to your hard drive
  2. Log into Blogger.com and select the blog for which you want to install your template
  3. Go to Design>Edit HTML and click the Upload link near the top of the page
  4. Locate bb-xmas.xml on your hard drive and select this template to upload
  5. Choose whether or not to retain any gadgets which are not included in your new template. If you choose to keep these gadgets, they will appear in the Page Elements section of your blog dashboard after upload.
  6. Enjoy your newly uploaded template!
All of the images used in this design are hosted on Picasa Web Albums. If you prefer, you can change these background images to those of your own design by editing the template's HTML code.


How to add gadgets to the Featured Content section

Go to Design>Page Elements in your Blog dashboard. Choose to add a new gadget in each of the three gadget-ready areas below the header section.
You can add any type of gadget in this section, such as Text, Image or AdSense. In the demonstration template, I added HTML/JavaScript gadgets populated by Lorem Ipsum text to demonstrate how these gadgets will appear.


To change the layout of your blog

Simply go to Design>Template Designer in your Blog dashboard and select the design aspect of your blog you wish to change. Most aspects of this template can be easily altered using the Blogger Template Designer, such as font and background colours, width and layout style.

Credits

Utilizes Smashing Icons by IconEdenSilent Night Icons by ArtDesigner.lv and Christmas Icons 2007 bygakuseisean. All other design elements and Blogger specific code developed by Amanda Kennedy of Blogger Buster.

Usage and Licensing

Feel free to use this template for any purpose under the Creative Commons 3.0 Attribution License.


What do you think?

I hope you enjoy using this free Blogger template. Please feel free to leave your comments and suggestions below.

Thứ Bảy, 13 tháng 7, 2013

Add A Different Background For Author Comments In Blogger's Threaded Comments

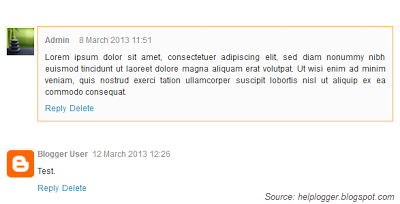
In this tutorial we will learn how to highlight the author comments so that they will have a different background color, border, or anything that makes them stand out from the others. To achieve this, we need to add a code in the Blogger's template and to modify the style according to our preferences.
blogger tricks, blogger comments
  

HOW TO HIGHLIGHT AUTHOR COMMENTS IN BLOGGER:

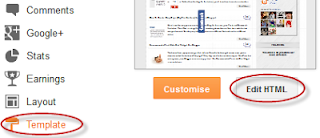
Step 1. Go to Template, click on Edit HTML

blogger threaded comments, customize blogger comments

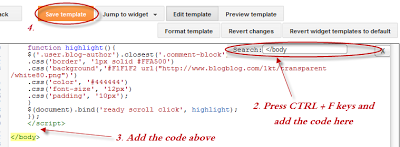
Step 2. Click anywhere inside the code area and try to find - using CTRL + F keys - this tag:
 </body>
Screenshot:
blogger comments, blogger tricks

Step 3. Just above it, paste the following code:
 <script src='http://code.jquery.com/jquery-latest.js'/>
<script>
$(function() {
function highlight(){
$('.user.blog-author').closest('.comment-block')
.css('border', '1px solid #FFA500')
.css('background','#F1F1F2 url("http://www.blogblog.com/1kt/transparent/white80.png")')
.css('color', '#444444')
.css('font-size', '12px')
.css('padding', '10px');
}
$(document).bind('ready scroll click', highlight);
});
</script>

Customizing the Author Comments:


Border:
The line marked in orange represents the border's style.
What it can be done:
  • 1px - you can increase the value to change the border's thickness
  • solid - change the border's style to dotteddashed, inset, outset etc.
  • #FFA500 - this is the border's color value, change it with your own color

Background:
The line marked in blue represents the background's style. You can use a plain color or an image. By default there's a combination of both (a white transparent image with a gray plain color).
To change/add:
  • a different color: replace the #F1F1F2 value with your own (use this tool to find the hex code of your desired color)
  • an image: replace the defaul url http://www.blogblog.com/1kt/transparent/white80.png with that of your image

Font Color:
To change the font's color, replace the #444444 color value in green with your own. (you can use this tool to find the hex code of your desired color)

Font Size:
Modify the value in red by increasing/decreasing the "12" value in order to change the size of text.

Step 4. Now Save your Template.

To customize the entire style of threaded comments, please check my previous tutorial on How to Customize Comment's Background, Font Color and Border in Blogger.

Chủ Nhật, 7 tháng 7, 2013

Free Blogger Template - CleanRed Portfolio Design

CleanRed is a portfolio style template, originally created for CSSHeaven.org and now converted for use as a Blogger template.

CleanRed Homepage, including a welcome message above the latest posts

This template is wholly compatible with Blogger's Template Designer. All fonts, font colours, background colours and widths may be changed through the interface. It's even possible to change the layout while retaining most of the template's stylistic properties!


About the CleanRed Template for Blogger

CleanRed was designed to be used as a portfolio template for designers, artists or anyone else who wishes to showcase their best work!

My aim in converting CSSHeaven's original CSS template was to build a Blogger template which matched the design as closely as possible while retaining all of the template features of Blogger's new interface.

This means that a couple of minor elements were omitted, but that the Blogger template is almost completely customizable. 

Features of this free Blogger template

  • Header placement in the left sidebar (rather than above the whole content) which appears in a logo-style design using only CSS!
  • welcome message (operated by a simple text gadget) which appears only on the home page.
  • A stylish resume link for the welcome message box, which you can choose to omit if preferred
  • Custom header styles for static pages, where the page title appears in bold white on a red background.
  • Blog pages feature a "Blog" heading, making it easy for visitors to see the page type they are on.
  • A custom-styled search box in the left sidebar
  • No custom code for the blog or gadgets, enabling quick upgrades in the future when Blogger adds new functions.
  • Layout customization enabled, so you can easily change the width of the template and sidebar; change the position of the sidebar, or even opt for a one/three column layout if prefered!
Here are some screenshots of the different page types:

Static Page Layout
Blog Page Layout
Be sure to check out the demo for this template to see the different page designs in action.

How to use the CleanRed Blogger Template

Download the zip folder for this template and extract the contents to a location on your computer.

The "clean-red-blogger-template.xml" file is the actual template file required for installation. All other files are to help you use this Blogger template to best effect.

Using the instructions found on this page, upload your new Blogger template to your site. 

Once you've uploaded your template, most of the design will already be in place. We just need to tweak a few elements to make it appear more like the demo site.

There is no need to host the images required for this template as I have already hosted these on Picasa Web Albums for this project.  However, I have included all of the image files used in this template in the Zip folder for this project in case you would prefer to host the files on your own server.

Add your "Welcome" text and resume link (optional)

Go to the Layout screen and choose to edit the "Welcome" gadget which appears above the Blog Posts gadget.

Change the title to suit your own welcome message, and add the content you would like to appear in this section.

If you would like to add a link to your resume, first you will need to upload your resume to a location online (Google Docs is a great place to host PDF files for free!). Make a note of the URL link to your resume.

After you have written the text for your welcome section, switch to edit the content in HTML mode and paste the following code, replacing your-resume-url with the URL where your resume is hosted:

<a href="your-resume-url" class="resume">Download Resume</a>

Finally, save the changes you've made to the Text gadget. You'll now see your welcome message appear on the home page, complete with a customized link to your resume (if you have chosen to add this).

Configure your Page List gadget

If your page list gadget looks a little odd, chances are you'll need to change one or two aspects.
  1. Remove the title of your gadget if it exists
  2. Choose to show a lesser number of pages by de-selecting non-essential pages from the gadget settings (four or five page links work best in this template)


Add the custom search gadget

I understand that not everyone likes to use the Blogger search function for their sites, so I have made the custom search box an optional feature rather than a built-in one.

If you would like to use the custom search box, paste the following code into the HTML/JavaScript gadget which appears below the Page Links gadget in the Layout section of your Blogger dashboard:

<div id="search">
        <form action="/search" method="get">
        <div id="searchfield"><input type="text" name="q" id="s" /></div>
          <div id="searchbtn"><input type="image" src="https://blogger.googleusercontent.com/img/b/R29vZ2xl/AVvXsEjYN2oLJApH8PPNDQ1ERd44n49jTsHYyWjAvDFbh5rwsmIrEtz0axAju3HqA9rPsI1MSmSTgdMnzegHBxjJSlMTXsN2M5CXnulnV7Pmb3V-G8_P7CXjygleZ6L3dqlVJ6zAYPii-EeKzQ8/s1600/searchgobtn.png" alt="search" /></div>
        </form>
    </div>

Then save your changes and the search box will appear in your layout.

License and Attribution

Creative Commons License
This work is licensed under a Creative Commons Attribution-NonCommercial-ShareAlike 3.0 Unported License. This template is based on the CleanRed CSS template by CSSHeaven.org and was converted for use as a Blogger Template by Amanda Kennedy for Blogger Buster readers.

If you use this template, please be sure to retain the attribution text in the template's HTML code.

You may not sell this template or otherwise pass it off as your own as this violates the terms of the Creative Commons license!

What do you think of the CleanRed Template?

CleanRed is the first free Blogger template I have released since Blogger's Template Designer was launched. I hope to have made this template fully compatible with the new interface while retaining a lot of the original designs functionality and appearance.

Please feel free to leave your comments and suggestions below and be sure to let me know if you have any issues!


Copyright @ 2013 Max Bloger 8.

Designed by Templateify & Sponsored By Twigplay