Latest Videos

Chủ Nhật, 25 tháng 8, 2013

How to Find a Forgotten Email Address Used in Blogger

In this feature I will show you a tip on how to find the email address you’re using in in Blogger in case you had  forgotten it. You may have lots of Google accounts and then comes a point wherein you can’t even remember which of these email addresses you used for your Blogger blog. No worries. Here’s what I found courtesy of Lasantha Bandara if that happens.
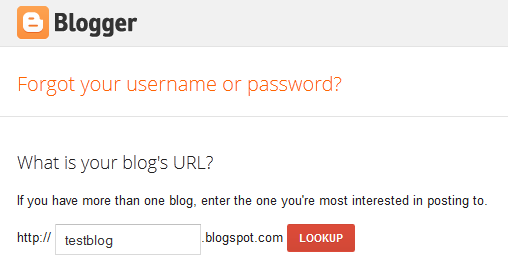
Simply enter your blog URL you want to access here: http://www.blogger.com/forgot.do
After you have entered it and clicked Lookup, Blogger will send an email with sign-in instructions to that email address.

Thứ Ba, 20 tháng 8, 2013

Minimal Swiss Design - Free Blogger Template Released

Although I rarely choose to convert other theme formats to Blogger, every so often a design comes along which I'd love to be available for my favourite platform.

The Minimal Swiss Design theme by Marios Lublinski (released by Smashing Magazine) is just one of those templates. Ideally suited to artists and designers, this simple and beautiful theme instantly inspired me to create a Blogger conversion (including additional theme options for customizing the design).

I'm releasing this Blogger template for free under the GPLv2 License, which means you can use them for all your projects for free and without any restrictions.

Take a look at the live demo site to see this theme in action


Features of this theme


Minimal Swiss Design is a simple CSS-based theme which uses no external JavaScript and loads swiftly in the browser.

It features a three column layout with two narrow sidebars which are ideally suited to Picture gadgets for display of visual portfolio items and is wholly compatible with the Blogger template designer for customization of backgrounds, colours and fonts.

More features include:
  • Widget sections in the header for address details and social media links
  • Use of custom fonts from the Google Font Directory
  • Choose to display post titles only on item pages (perfect for a portfolio site) or site-wide
  • Upload your own background image using the Blogger template editor
  • Change all background colours, fonts and font colours to create a visual theme of your own
I've checked the design in a wide variety of browsers and am assured of it's compatibility right back to Internet Explorer 6!


How to install this template

This Minimal Swiss Design theme works right out of the box and can be installed in just a few mouse clicks!

First you'll need to download the version you would like to use:
Once you've downloaded the appropriate file, extract the template to a location on your computer.

Now log into your Blogger dashboard and go to Design>Edit HTML. Near the top of this page you'll see a section where you can choose to "Upload a new template". Click this button which will prompt you to locate the XML file for your template.

Select your extracted template file and click "Upload".

Note: You may receive a notice that gadgets in your existing template are not present in the new design. If you would like to keep these widgets, select "Keep widgets" from the options available (alternatively you can choose to delete these widgets).

Once the upload is complete, choose to "View blog" to see the new template in action.


Add your gadgets to the sidebar

This template was designed primarily to be used as a portfolio site and is very suited to image gadgets in the sidebars.

Go to Design>Page Elements to add gadgets to your layout. When you add Picture gadgets through this page, the images you upload will be automatically resized to fit the sidebar's width.

Note: Gadget titles in the sidebar will appear if present (using the "Syncopate" font used for the blog title). If you do not want to display gadget titles, do not add a title for your gadget.


Customize the design

This template is fully compatible with the Blogger template designer, enabling us to customize the appearance using the WYSIWYG editor with live previews. You can even remove the background image and replace it with an image of your own!

To customize the Minimal Swiss Design template, simply go to Design>Template Designer in your Blogger dashboard and select your chosen options from the menu in the left column:

Customize the background image
Customize fonts and colours

Demo and Downloads

Credits and usage guidelines

This theme was converted from the original Wordpress design by Marios Lublinski, which is distributed by Smashing Magazine.

It is available for use under the GPLv2 License which enables free use for all your personal and commercial projects without the requirement of attribution. In other words, you don't have to link back to Blogger Buster or Marios Lublinski (though of course we wouldn't complain if you do!).

If you'd like to spread the word about this free template, please link to this article rather than the actual download link so others may find complete instructions for installation, customization and credits.

Thứ Bảy, 17 tháng 8, 2013

Add Syntax Highlighter to Blogger

There are quite few good Syntax Highlighters out there, one of them is “Prettify” which is simple and lightweight. Prettify states that it can automatically guess and highlight code snippets for many languages (best on C-likeand HTML-like) and also has many language extensions, if you need one. So I setup a simple demo to test it and the result was quite good.


                                                                 Demo

Simple setup

Adding Prettify Syntax Highlighter to any CMS or webpage is very easy. For Blogger you just need to go to your blog’s Template tab, click “Edit HTML” button and add the below script before </body> tag.
<script src="https://google-code-prettify.googlecode.com/svn/loader/run_prettify.js"></script>
As you can see that the project is hosted on Google Code. This is an auto-loader which will automatically load the required JavaScript API and the CSS file from the subfolders of SVN. So the last thing that you are left is to mention where it should highlight the codes by adding class="prettyprint" to preand/or code tags within Blogger Post Editor, HTML view. Here is an example:
<pre class="prettyprint">
$(function() {
 alert('I am using Prettify as Syntax Highlighter');
});
</pre>
There are also some styles available that you can call and load the stylesheet in one URL, here is an example:
<script src="https://google-code-prettify.googlecode.com/svn/loader/run_prettify.js?skin=desert"></script>

Own hosting

Well, the above tutorial was the simple yet effective setup but what if you want to host Prettify on your own server? Blogger don’t allow us to host files directly, so if you have got a hosting service then it’s good, otherwise you can use Google Code to upload the syntax highlighter files.
Download the file form this page, extract it using archive software like WinRAR or 7-Zip and upload “prettify.css” and “prettify.js” files by creating a project. Now same as above add the CSS file before</head> and the script before </body> tag respectively. To execute it you need to addprettyPrint(); before closing body tag as shown below:
<html>
<head>
{All head contents}

<b:skin><![CDATA[
{Inline CSS}
]]></b:skin>
<link href="https://example.googlecode.com/.../svn/prettify.css" type="text/css" rel="stylesheet" />
{Other JavaScript}
</head>
<body>
{Header, Footer, DIVs}

<script src="https://example.googlecode.com/.../svn/prettify.js"/>
<script>prettyPrint();</script>
</body>
</html>
It is not mandatory to add the external CSS file but instead you can add inline CSS before ]]><b:skin>to highlight the syntaxes with some style.
Find more about it on:

Thứ Tư, 14 tháng 8, 2013

How to add Description Meta tag to Blogger

Adding Description Meta tag is one of the goodSEO practices. These tags are HTML attributes which tell the search engines about the content of the page and describes it. Description tags don’t helps in ranking high within search result pages but helps in good clickthrough rates.
Many years back, search engines used to show the result snippets of these Description Meta tags but recently some search engines, like Google, shows preview snippets depending on user searches.

Just like any other top CMS, like WordPress.org, blogs powered by Blogger also have the feature to add Description Meta tags to every page, you just need to enable some settings, in this tutorial let us see how.

Check for the required codes

First and foremost thing that you should do is to check for the required code which will actually add the Description Meta tags within your Blogger templates. So go to “Template” tab of your blog from the dashboard and then click “Edit HTML” button. Now find the the below code:
<b:include data='blog' name='all-head-content'/>
If the above code is there then you don’t have to add any other codes. But if you have edited and customized your templates where the above cannot be found then only add the below codes after<head>.
<b:if cond='data:blog.metaDescription != &quot;&quot;'>
  <meta expr:content='data:blog.metaDescription' name='description'/>
</b:if>

Turning the feature On

From your blog’s dashboard go to Settings > “Search Preferences” tab > Meta tags > Description > click “Edit” and select “Yes” for “Enable search description?”. Within the textarea write a brief description about your blog. This will add description Meta tag to the homepage.
Blogger SEO settings
Blogger description settings
Note: Whether you write something on the textarea or not, don’t forget to click the “Save” button, otherwise you will not be able add Meta tags to your posts.

Adding Description Meta tag to Posts and Static Pages

While writing a new post from Blogger Post Editor, find for “Search description” on right-hand side panel under Post Settings. Click it and a box will open where you can write a very brief description about your post, click Done and then if you think that your article is ready to get published, click the “Publish” button. This will add description Meta tag to your post. The same way, you can also add Meta description tags to your older posts by editing them.
Blogger posts description

How many words?

Description Meta tags should not be too long or too short. The best is if you keep it under 160 characters but above 85 characters, including spaces of course.
Things to remember:
  • To generate search result snippets Description Meta tags are not needed but it is good to provide one for every page.
  • It should be concise and accurate. To learn more visit Webmasters help article.
  • As told earlier, it doesn’t help you in ranking high in SERP. Good traffic comes from writing good and original articles and following some SEO guidelines.
Chủ Nhật, 11 tháng 8, 2013

Create Horizontal Navigation Menu With Drop Down Submenus Using CSS

The following drop down menu is made only with CSS, is a horizontal menu with sub-tabs and the right side has a rounded search. A menu is handy for those who do not require complex menus or prefer not to use one that requires scripts and/or too many images, also the installation and customization is quite simple, and to top it off is quite functional.

To see this drop down menu in action, visit this demo blog 

blogger menu, drop down menu, css menu

Prior to doing anything, if you are using a Template made through Blogger Template Designer, then you should consider doing these changes in the template, otherwise the menu might not be displayed correctly:

From your Blogger's Dashboard, go to Template (make a backup < see the screenshot) > Edit HTML:


and search (CTRL + F) for the following line:

 <b:section class='tabs' id='crosscol' maxwidgets='1' showaddelement='yes'>

Screenshot

Remove the code in red.
You may have many parts as the one in red, delete all you find.

....then find this section in your template:
 /* Tabs
----------------------------------------------- */

...and remove all that is within it, until you reach to the Headings part. 

 /* Tabs
----------------------------------------------- */
.tabs-outer {
overflow: hidden;
position: relative;
background: $(tabs.background.color) $(tabs.background.gradient) repeat scroll 0 0;
}

#layout .tabs-outer {
overflow: visible;
}

.tabs-cap-top, .tabs-cap-bottom {
position: absolute;
width: 100%;

border-top: 1px solid $(tabs.border.color);

}

.tabs-cap-bottom {
bottom: 0;
}

.tabs-inner .widget li a {
display: inline-block;

margin: 0;
padding: .6em 1.5em;

font: $(tabs.font);
color: $(tabs.text.color);

border-top: 1px solid $(tabs.border.color);
border-bottom: 1px solid $(tabs.border.color);
border-$startSide: 1px solid $(tabs.border.color);
}

.tabs-inner .widget li:last-child a {
border-$endSide: 1px solid $(tabs.border.color);
}

.tabs-inner .widget li.selected a, .tabs-inner .widget li a:hover {
background: $(tabs.selected.background.color) $(tabs.background.gradient) repeat-x scroll 0 -100px;
color: $(tabs.selected.text.color);
}

/* Headings
----------------------------------------------- */

Then add this to where the code has been removed (instead of the code in green):
 #crosscol ul {z-index: 200; padding:0 !important;}
#crosscol li:hover {position:relative;}
#crosscol ul li {padding:0 !important;}
.tabs-outer {z-index:1;}
.tabs .widget ul, .tabs .widget ul {overflow: visible;}
Having done this, we can finally add our menu.

How To Add Horizontal Drop Down Menu to Blogger 

To put this horizontal menu with submenus in your blog, then follow the next steps:

Step 1. From Template, go to Edit HTML and just above ]]></b:skin> paste these styles:
 /* Horizontal drop down menu
----------------------------------------------- */
#menuWrapper {
width:100%; /* Menu width */
height:35px;
padding-left:14px;
background:#333; /* Background color */
border-radius: 10px; 
}
.menu {
padding:0;
margin:0;
list-style:none;
height:35px;
position:relative;
z-index:5;
font-family:arial, verdana, sans-serif;
}
.menu li:hover li a {
background:none;
}
.menu li.top {display:block; float:left;}
.menu li a.top_link {
display:block;
float:left;
height:35px;
line-height:34px;
color:#ccc;
text-decoration:none;
font-family:"Verdana", sans-serif;
font-size:12px; /* Font size */
font-weight:bold;
padding:0 0 0 12px;
cursor:pointer;
}
.menu li a.top_link span {
float:left;
display:block;
padding:0 24px 0 12px;
height:35px;
}
.menu li a.top_link span.down {
float:left;
display:block;
padding:0 24px 0 12px;
height:35px;
}
.menu li a.top_link:hover, .menu li:hover > a.top_link {color:#fff; }
.menu li:hover {position:relative; z-index:2;}
.menu ul,
.menu li:hover ul ul,
.menu li:hover ul li:hover ul ul,
.menu li:hover ul li:hover ul li:hover ul ul,
.menu li:hover ul li:hover ul li:hover ul li:hover ul ul
{position:absolute; left:-9999px; top:-9999px; width:0; height:0; margin:0; padding:0; list-style:none;}

.menu li:hover ul.sub {
left:0;
top:35px;
background:#333; /* Submenu background color */
padding:3px;
white-space:nowrap;
width:200px;
height:auto;
z-index:3;
}
.menu li:hover ul.sub li {
display:block;
height:30px;
position:relative;
float:left;
width:200px;
font-weight:normal;
}
.menu li:hover ul.sub li a{
display:block;
height:30px;
width:200px;
line-height:30px;
text-indent:5px;
color:#ccc;
text-decoration:none;
}
.menu li ul.sub li a.fly {
/* Submenu Background Color */
background:#333 url(https://blogger.googleusercontent.com/img/b/R29vZ2xl/AVvXsEg5Is6XV4iEJHqmvDFHy0lgM0kFrz5x-kh1B6zTOCNDtBZX81sEqA0OYmzCIdYDBz5xYx-OnDI_qS60pwdIXsiHis6aIWLjume_2t3c2SkoZsojakPaGpoK50TMj47GrCy4GplsnBq6eho/s1600/arrow_over.gif) 185px 10px no-repeat;}
.menu li:hover ul.sub li a:hover {
background:#515151; /* Background Color on mouseover */
color:#fff;
}
.menu li:hover ul.sub li a.fly:hover, .menu li:hover ul li:hover > a.fly {
/* Background on Mouseover */
background:#646464 url(https://blogger.googleusercontent.com/img/b/R29vZ2xl/AVvXsEg5Is6XV4iEJHqmvDFHy0lgM0kFrz5x-kh1B6zTOCNDtBZX81sEqA0OYmzCIdYDBz5xYx-OnDI_qS60pwdIXsiHis6aIWLjume_2t3c2SkoZsojakPaGpoK50TMj47GrCy4GplsnBq6eho/s1600/arrow_over.gif) 185px 10px no-repeat; color:#fff;}

.menu li:hover ul li:hover ul,
.menu li:hover ul li:hover ul li:hover ul,
.menu li:hover ul li:hover ul li:hover ul li:hover ul,
.menu li:hover ul li:hover ul li:hover ul li:hover ul li:hover ul {
left:200px;
top:-4px;
background: #333; /* Background Color of the Submenu */
padding:3px;
white-space:nowrap;
width:200px;
z-index:4;
height:auto;
}
#search {
width: 228px; /* Width of the Search Box */
height: 50px;
float: right;
z-index: 2;
text-align: center;
margin-top: 5px;
margin-right: 6px;
/* Background of the Search Box */
background: url(https://blogger.googleusercontent.com/img/b/R29vZ2xl/AVvXsEhHn-QVa7TbcG1J9TjZnQUQAdLTKyM8o_YwcNls6wg49LR7uNUZnnoNtgN0LtJAJFJdEWiQ-4S-LX4dlO4sckUgekRlpmG-9I_JxnApfvzbxgOWZYrIc3SqNaK2Pmbku8kcPAC2Sm3XYec/s1600/searchBar1.png) no-repeat;
}
#search-box {
margin-top: 3px;
border:0px;
background: transparent;
text-align:center;
}


Screenshot
Step 2. Save the Template


Step 3. Go to Layout > click on Add a Gadget link


Step 4. Choose HTML/Javascript and paste the following inside the empty box:

 <div id='menuWrapper'>
<ul class='menu'>
<li class='top'><a class='top_link' href='Link URL'><span>Title 1</span></a></li>

<li class='top'><a class='top_link' href='Link URL'><span class='down'>Title 2</span></a><ul class='sub'><li><a class='fly' href='Link URL'>Submenu 2.1</a><ul>
<li><a href='Link URL'>Submenu 2.1.1</a></li>
<li><a href='Link URL'>Submenu 2.1.2</a></li>
<li><a href='Link URL'>Submenu 2.1.3</a></li>
</ul>
</li>
<li class='mid'><a class='fly' href='Link URL'>Submenu 2.2</a>
<ul>
<li><a href='Link URL'>Submenu 2.2.1</a></li>
<li><a href='Link URL'>Submenu 2.2.2</a></li>
<li><a href='Link URL'>Submenu 2.2.3</a></li>
<li><a class='fly' href='Link URL'>Submenu 2.2.4</a>
<ul>
<li><a href='Link URL'>Submenu 2.2.4.1</a></li>
<li><a href='Link URL'>Submenu 2.2.4.2</a></li>
<li><a href='Link URL'>Submenu 2.2.4.3</a></li>
</ul>
</li>
<li><a href='Link URL'>Submenu 2.2.5</a></li>
<li><a class='fly' href='Link URL'>Submenu 2.2.6</a>
<ul>
<li><a href='Link URL'>Submenu 2.2.6.1</a></li>
<li><a href='Link URL'>Submenu 2.2.6.2</a></li>
</ul>
</li>
</ul>
</li>
<li><a href='Link URL'>Submenu 2.3</a></li>
<li><a href='Link URL'>Submenu 2.4</a></li>
<li><a href='Link URL'>Submenu 2.5</a></li>
</ul>
</li>

<li class='top'><a class='top_link' href='Link URL'><span class='down'>Title 3</span></a>
<ul class='sub'>
<li><a href='Link URL'>Submenu 3.1</a></li>
<li><a href='Link URL'>Submenu 3.2</a></li>
<li><a href='Link URL'>Submenu 3.3</a></li>
<li><a href='Link URL'>Submenu 3.4</a></li>
</ul>
</li>

<li class='top'><a class='top_link' href='Link URL'><span class='down'>Title 4</span></a>
<ul class='sub'>
<li><a href='Link URL'>Submenu 4.1</a></li>
<li><a class='fly' href='Link URL'>Submenu 4.2</a>
<ul>
<li><a href='Link URL'>Submenu 4.2.1</a></li>
<li><a href='Link URL'>Submenu 4.2.2</a></li>
<li><a href='Link URL'>Submenu 4.2.3</a></li>
<li><a href='Link URL'>Submenu 4.2.4</a></li>
<li><a href='Link URL'>Submenu 4.2.5</a></li>
<li><a href='Link URL'>Submenu 4.2.6</a></li>
</ul>
</li>
<li><a href='Link URL'>Submenu 4.3</a></li>
<li><a href='Link URL'>Submenu 4.4</a></li>
<li><a href='Link URL'>Submenu 4.5</a></li>
<li><a href='Link URL'>Submenu 4.6</a></li>
</ul>
</li>

<li class='top'><a class='top_link' href='Link URL'><span class='down'>Title 5</span></a>
<ul class='sub'>
<li><a href='Link URL'>Submenu 5.1</a></li>
<li><a href='Link URL'>Submenu 5.2</a></li>
<li><a href='Link URL'>Submenu 5.3</a></li>
</ul>
</li>


<!-- Search Bar -->
<li>
<form action='/search' id='search' method='get' name='searchForm' style='display:inline;'>
<input id='search-box' name='q' onblur='if (this.value == &quot;&quot;) this.value = &quot;Search here...&quot;;' onfocus='if (this.value == &quot;Search here...&quot;) this.value = &quot;&quot;;' size='28' type='text' value='Search here...'/></form>
</li>

</ul>
</div>

Customization:

- replace the text in blue and red with your links and titles.
- if you need more tabs, then add a line like this just above <!-- Search Bar -->

 <li class="top"><a href="Link URL" class="top_link"><span>Title</span></a></li>

- if you want to add a tab with sub-tabs, then add this code:

 <li class="top"><a href="Link URL" class="top_link"><span class="down">Title</span></a>
<ul class="sub">
<li><a href="Link URL">Submenu Title</a></li>
</ul>
</li>

- and if you want one of the other sub-tabs have sub-tabs then remove a line like the one in orange and change it to a code like this:

 <li><a href="Link URL" class="fly">Submenu Title</a>
<ul>
<li><a href="Link URL">Other Submenu</a></li>
</ul>
</li>

And that's it! Now Save your Widget and enjoy your new drop down menu! ;)

Thứ Tư, 7 tháng 8, 2013

5 Tips On How To Reduce Your Blog’s Bounce Rates

We already know that bad website design and poor content can deter your website’s visitors, but if you think that that’s all there is to it then think again. It may be hard to believe but apparently lots of website owners and bloggers, especially those who are new, still miss the other minor but important factors in making your visitors stay longer and return to your site.
Bounce rate, in layman’s terms, is basically the number of single visits in your site that results in the visitor spending only a short amount of time and then leaving immediately, hence the term ‘bounce’. You don’t want your visitors to bounce off of your site, so below is a list of tips on how you can minimize that from happening.
  • Provide Easy Site Navigation – One thing that turns visitors off from a website is not knowing where and how to locate your site features. If your visitors have a hard time finding links to certain pages on your site, you can bet that the next thing they’ll look for is a way out of your site. Being forced to search for buttons or links just to go to another page on your site can be as frustrating as having to search for the TV remote just so you can change the channel.
  • Minimize Ads – Do you know the feeling that you get when you have to sit through all those commercials just so you can watch your favorite TV show? That’s what it’s like for visitors when see all these ads and banners on your site: it overwhelms them. Having too many ads on a website is a turn off for visitors and therefore a no-no if you want them to stick around longer.
  • Make Sure You Have A Search Box – Believe it or not, some blogs and websites actually don’t have a search box feature, which is another no-no because visitors do use it. It makes it easier for them to find what they’re looking for than clicking through a lengthy list of archive, labels, and categories.
  • Improve Your Site’s Loading Speed – Nobody wants to be kept waiting, and that includes your site’s visitors. Don’t test their patience by making them wait for your whole site to finish loading. One common cause of slow page loads is having way too much widgets or plugins installed in your site. You could say that having too many widgets is almost as wrong as having too much ads on a website; one annoys the visitors while the other makes them wait.
  • Interlink Your Blogs Posts – To put it simply, provide links to your other [older] posts somewhere inside your articles. The way to do this is by referencing a topic that you have previously written about, which will act like a “Related Posts” link from within your article. For example,  if you were to mention “increasing website security by using a PHP script,” on your article and you have already written an article on said script, you can hyperlink the phrase “using a PHP script” to that particular phrase.

Chủ Nhật, 4 tháng 8, 2013

How to Have A MetroStyle Cloud Label Or Categories List


So in one of our previously featured Blogger tutorials you learned how to add a social sharing widget which design is inspired by Windows 8’s Metro-style UI. This time, you’ll learn how to design your Categories or Labels list in a similar fashion.
Sidhnath Sinha of TricksHunt came up with the CSS design so credit goes to him.
Follow the steps below.
  • From your Blogger dashboard, go to Design and then Template.
  • Choose Edit HTML then click on Proceed.
  • Using Ctrl+F, look for ]]></b:skin> in your blog’s template code.
  • Copy/paste the following code below right above it.
 
/*--- TricksHunt.com Custom Label Cloud --- */
.Label a{
padding-left:10px;
background:#0090D5;
padding:0 10px;
color:#fff!important;
height:26px;
line-height:26px;
text-decoration:none;
border:none !important;
-webkit-transition:all .3s ease-in-out !important;t: 30pxt: 30px;
float:left;
margin-left:1px;
margin-top:1px;
font-size:13px; }
.Label a:hover{
background:#69625A;
-webkit-border-radius: 1px;
-moz-border-radius: 1px;
border-radius: px;
}     
TIP: To change the label color, simply replace #0090D5 with the corresponding HEX code of your preferred color. To change the color of the label upon mouseover or on hover, replace #69625A. You can also change 13px t adjust the font size.
  • Save your template.
  • Next, go to Layout, click on the Edit button of your Labels gadget.
NOTE: If you currently have no Labels gadget then just click on an Add a Gadget button and then scroll down the list of gadgets and select Label.
  • Now follow these Label gadget settings:
Title = Labels
Show = All Labels
Sorting = Alphabetically
Display = Cloud
  • Uncheck Show number of posts per label.
  • Save your gadget and you’re done.
View your blog to see the effect. Enjoy and have a good day!


Copyright @ 2013 Max Bloger 8.

Designed by Templateify & Sponsored By Twigplay